In this QuickBooks tutorial, we will walk you through the steps to reconcile in QuickBooks Desktop. First, we want to ensure we have our copy of QuickBooks open.
If you would like us to create a video demonstrating how this is done, please leave a comment below, or contact us for a one-on-one consultation.
Using QuickBooks Online? Check out Intuit’s blog here to learn how to reconcile accounts in QuickBooks Online.
Reconciliation in QuickBooks Desktop is a vital process for ensuring the accuracy and integrity of your financial records. Companies may find reconciling within QuickBooks Desktop essential for maintaining accurate financial records and ensuring the integrity of their accounts. By regularly reconciling their bank and credit card accounts, businesses can identify discrepancies, errors, or fraudulent activities promptly, thus safeguarding against financial mismanagement and potential losses.
Additionally, reconciliation provides a clear audit trail, aiding in regulatory compliance and financial reporting requirements. Learning how to reconcile in QuickBooks Desktop is crucial for businesses to streamline financial processes, improve cash flow management, and optimize their financial operations for better efficiency and profitability. In essence, reconciliation within QuickBooks Desktop is not just a routine task; it’s a strategic practice that empowers companies to maintain financial transparency, mitigate risks, and achieve long-term financial success.
Here’s a step-by-step guide for how to reconcile in QuickBooks Desktop:
1. Backup Your QuickBooks Company File: Before starting the reconciliation process, it’s crucial to create a backup of your QuickBooks Company File. This ensures that your financial data is protected in case of any errors or issues during reconciliation.
2. Access the Reconcile Menu: Begin by navigating to the reconcile menu in QuickBooks Desktop. You can do this by either clicking on the “Banking” header from the home screen or selecting the reconcile option from the banking menu at the top of the screen.
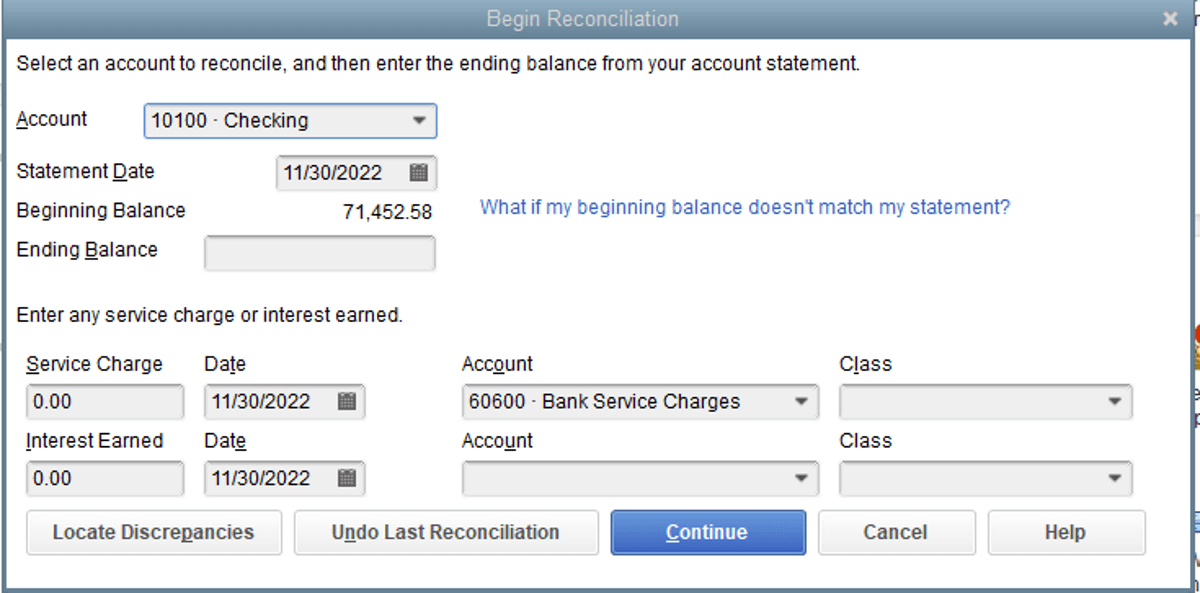
3. Open the “Begin Reconciliation” Window: Once you’re in the reconcile menu, open the “Begin Reconciliation” window. Here, you’ll need to input key details to initiate the reconciliation process.
4. Fill Out the Necessary Fields: In the “Begin Reconciliation” window, you’ll find several fields that need to be filled out accurately. Start by selecting the account you’re reconciling from the dropdown menu. Input the statement date and the ending balance from your bank statement, ensuring it matches the beginning balance in QuickBooks.
5. Enter Additional Information: You’ll also have the option to input any service charges or interest earned during the reconciliation period, along with their associated dates and accounts. Class tracking is optional but can be useful for companies that need to categorize transactions by class for reporting purposes.
6. Continue to Reconciliation: After entering all the necessary information, click “Continue” to proceed to the reconciliation process itself.
7. Review and Reconcile Transactions: In the reconciliation window, you’ll see two columns: “checks and payments (AP)” on the left and “Deposits and Other Credits (AR)” on the right. Compare these transactions with your bank statement to ensure accuracy. Check off transactions in QuickBooks that match those on your bank statement.
8. Resolve Discrepancies: If you encounter any discrepancies during the review process, double-check your entries and reconcile any outstanding transactions to resolve the difference.
9. Ensure Zero Difference: Once you’ve reviewed and reconciled all transactions, ensure that the difference at the bottom right-hand corner of the reconciliation window is zero. This indicates that your QuickBooks records match your bank statement precisely.
10. Print Reconciliation Reports: It’s advisable to print reconciliation reports for your records. Selecting “both” allows you to print both the reconciliation summary and detail reports, providing comprehensive documentation of the reconciliation process and its outcomes.
11. Maintain Proper Documentation: Throughout the reconciliation process, maintain proper documentation and record-keeping practices. Organize bank statements, receipts, invoices, and other financial documents systematically to facilitate reconciliation and ensure accuracy in your records.
12. Reconcile Regularly: Reconcile your accounts on a monthly basis or as frequently as needed to maintain the financial health and stability of your business. Regular reconciliation enables you to identify and address discrepancies promptly, track cash flow, and optimize financial operations for better efficiency and profitability.
By following these steps, you can reconcile in QuickBooks Desktop effectively and maintain accurate financial records for your business.
As always: if you have any questions, comments, or concerns, call us!