For many businesses, invoices are one of the most important types of transaction for tracking sales in QuickBooks. Full of detailed options for tracking different information, and highly customizable, invoices allow you to track what your customers owe you for the products and services you sell.
Invoicing In QuickBooks Desktop
In QuickBooks terminology, an invoice is always a customer-facing document. “Vendor invoices,” or money you owe to your vendor, are tracked on a bill in QuickBooks. But invoicing is not the only way to track sales within QuickBooks.
Sales Receipts, a similar transaction type, can be used when the customer payment is rendered at the time of purchase. A retail store might make heavy use of sales receipts over invoices, for example, customers at retail stores will rarely be paying at a later date when shopping in person.
Statement charges are another useful option if you want to accumulate charges before requesting payment, or if you assess a regular monthly charge to your customer.
- NOTE: Statement charges are far less detailed / customizable than standard invoices. Use statement charges when you are not going to be providing the customer with an invoice, but instead will provide the customer with a periodic statement.
Step 1: Create an invoice in QuickBooks
We like to say there are generally five ways to do most anything in QuickBooks. Let’s look at the 5 most common ways we can create an invoice in QuickBooks 2018:
Method 1: Click the Create Invoices button on the home screen.
Method 2: From the Customer menu, choose “Create Invoices”.
Method 3: Choose “New Transactions” —> ”Invoices” from the top menu of the customer center.
Method 4: Right-click a customer in the customer center list and choose “Create Invoices”.
Method 5: From most screens, press Ctrl+I (for Invoice) on your keyboard.
Most of these options except the first, if performed with a customer selected in the customer center, will pre-fill that customer’s name on the invoice.
Step 2: Customize your invoice in QuickBooks
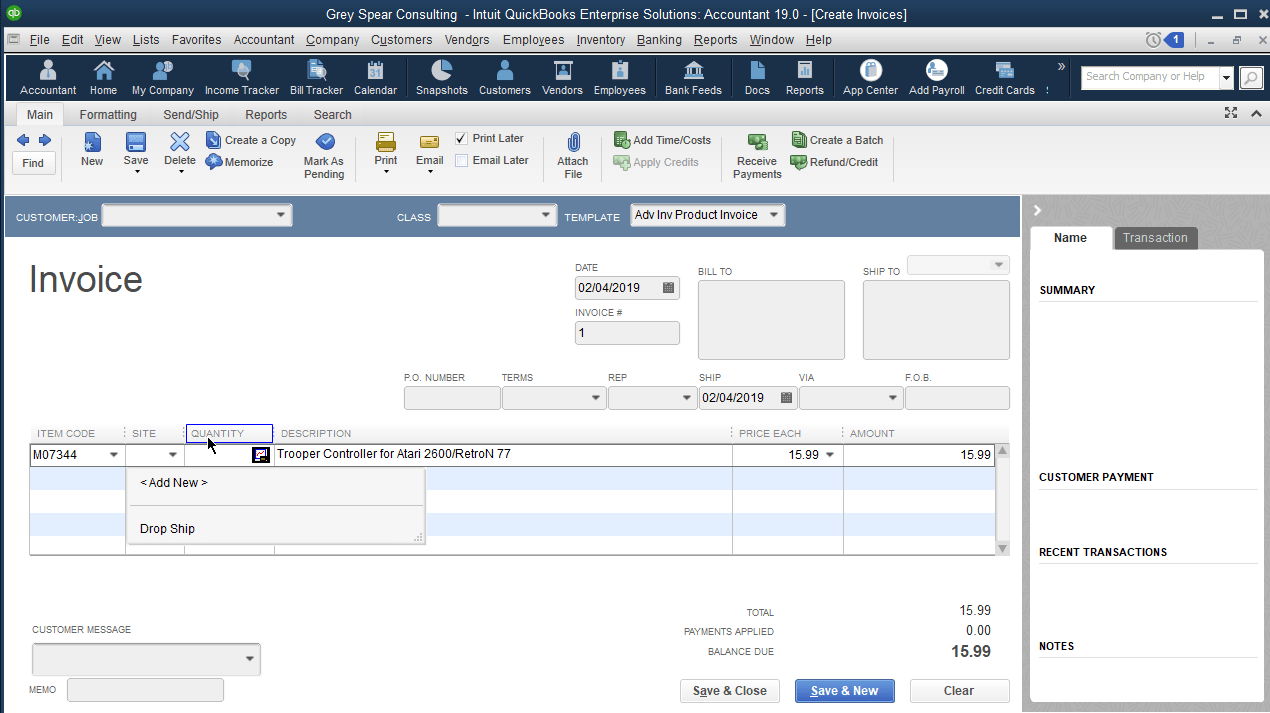
First, we’ll need to select a customer if one wasn’t auto-selected when we opened the form. You can use the drop-down list, or simply start typing the first few letters of the customer name in the box.
- NOTE: If the customer doesn’t exist in your QuickBooks file yet, you can even add them to the customer list from here.
The next very important piece of information to enter on an invoice is the DATE. Depending on your preferences, this could default to today’s date or to the date of the last invoice entered.
- Much of QuickBooks’ reporting is driven by dates, so it’s vital to *Ensure that you enter an accurate date for each transaction.
QuickBooks will try to generate a new invoice number for each invoice you create, by simply increasing the last-entered invoice number by 1. It’s a very simple automated numbering system and may not perfectly increment as expected with complex alphanumeric invoice numbers. You can change the number manually as well, just make sure to keep an eye on it and set it as needed. One other important note about the auto-numbering is that the invoice number incrementation is shared with credit memos.
- EXAMPLE: If you enter invoice #5052, then you enter a credit memo, it will default to #5053. Conversely, if you create that credit memo #5053, then the next invoice would have a default number of 5054.
Below the header of the invoice are the item lines. These are where you’ll enter the details of the items and services you’re selling on this invoice. You can use the item field on each line here much like the customer field above. You can select items from the drop-down, find them by typing the first few letters, or add an item from this screen. You’ll set the quantity and rate for items, and QuickBooks will calculate the amount for that item.
- NOTE: If you need to override the item’s default tax setting for any reason, you’ll also be able to select whether an item is taxable or not taxable on this screen.
If you need to remove an item, it’s best to use “Ctrl+Del“ or right-click and delete the line, to ensure the whole line is removed, rather than manually deleting data from the line. An improperly-deleted line can sometimes cause invoices to behave strangely.
If you need to add a note to the item lines, you can simply type it into the description field on a line with no item. This can be helpful for adding a custom message on the fly.
Below the item lines, in the footer, you’ll set the sales tax rate for this transaction. If multiple taxes apply, use a sales tax group. If some taxes apply to part of the transaction, but not others, consider using subtotals to total up items by tax applied, and a sales tax line item after to apply that tax to those items only.
The customer message is also here in the footer, where you can select a message you’ve pre-written to add to this invoice. Like most lists we’ve seen so far, you can add items to this list on the fly by typing them into the box.
The memo field in this area doesn’t show on the printed or emailed invoice, and is useful for keeping internal notes that you and your employees may need to know about the transaction.
The last option in this area is to set the customer tax code, though you will most likely wat to pull this from the customer entry. If you select a non-taxable code here, all the line items will also be set to non-taxable.
Choose Save & Close to create the invoice and close the window, or Save & New to create the invoice and open a new blank invoice. The Clear button will reset the current invoice to a new blank slate without saving.
Other Methods: More ways to create an invoice
Invoices can also be created from an estimate or sales order. When creating an invoice from a sales order, you can choose whether you want to create the invoice for the entire sales order, or for only some of the items. This will create a link between the sales order and the invoice, so that the sales order will reflect how many items have been invoiced.
Choosing to create an invoice from an estimate will give similar options, as well as an option to invoice for a percentage of the estimate, if the progress invoicing option has been enabled. Otherwise the entire estimate will be copied to the new invoice.
Another way to create invoices still involves one of the original methods of getting to a new invoice form and selecting a customer, as before. If you’ve marked expenses or items as billable on bills from vendors, meaning that you intend those costs to be passed on to the customer, you may notice a pop-up when selecting your customer on an invoice. You can also access this through the Add Time/Costs button in the invoice toolbar.
This window will allow you to accept items, expenses, and time marked as billable to add to the customer’s invoice, allowing for better, quicker, and more accurate billing of these items that works smoothly with your job cost reporting.
Tips & Tricks: Mastering the art of Invoicing in QuickBooks
Here are a few tips an tricks I have picked up that to help you make the best use of invoices:
- If you know or suspect something on a saved invoice has changed, there’s a fantastic way to check by using a pre-filtered version of the audit trail report. Rather than opening and filtering the audit trail manually, on newer versions of QuickBooks open the right-side panel menu from the invoice. On the Transactions tab, you can see when an invoice was created and when it was last changed, as well as a button that will take you to an audit trail report for just this transaction, where you can see its whole change history.
- Need to see what payments, sales orders, or estimates are linked to an invoice?
- Pull up the invoice
- Choose the reports tab from the invoice toolbar, then Transaction History, or simply press Ctrl+H with the invoice open. This should bring up the transaction history window, with the information on linked transactions. You can jump to those transactions by double-clicking them from here.
- If you’re not sure an invoice (or any other transaction) is hitting the accounts it should, for the right amounts, you can view a transaction journal, which is a sort of behind-the-scenes look at the transaction in journal form, showing you exactly what accounts are being debited or credited, and for what amounts. Open this with the Transaction Journal button on the Reports tab of the invoice, or press “Ctrl+Y” with the invoice open.
- Need to make an invoice that’s pretty much the same as another? Use the create Copy button to open a new invoice form with all the information from the current invoice, but with the date and number updated. If needed, you can change this before saving.
- Need to make the same invoice for the same customer on a regular basis? Use the Memorize button to set up a schedule and have QuickBooks automate the creation of these regularly scheduled transactions with the press of a button.
More Questions? Start the conversation
We offer training and education to QuickBooks fans across every industry at any knowledge level. The team of almost 50 full-time QuickBooks mavens at Out Of The Box Technology are constantly pumping out all kinds of educational resources, videos, training seminars, classes, blogs like this and so much more.


