It’s happened to everyone at one time or another. You lose a transaction you’re sure was there not even five minutes ago, but you just can’t seem to locate it. In the event this has ever occurred to you, QuickBooks has a great feature: The Audit Trail report.
To access the Audit Trail report, highlight Reports>Accountant and Taxes>Audit Trail. Upon launching the report, it defaults to today’s date. We are given several columns, including but not limited to: Num, Entered/Last Modified, Last Modified by, Date, Name, and Account. These columns CAN be modified and moved around as you desire, as not everything that may appear is relevant to you and your business.
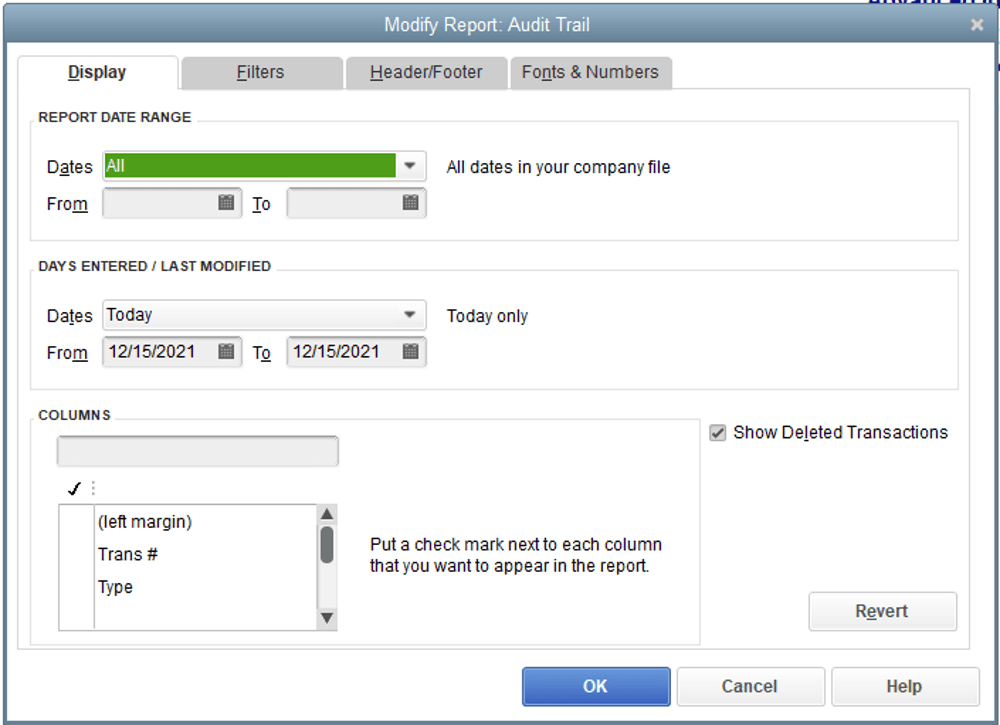
To customize the report to your liking, choose “Customize Report” in the upper left-hand corner of the report. Here we will be given the “Modify Report: Audit Trail” window. Within this window, we have 4 tabs: Display, Filters, Header/Footer, and Fonts & Numbers. In the following sections, we will discuss the various options under each tab heading.
Display:
Under the Display section, users have the flexibility to customize the appearance and content of the Audit Trail report according to their specific preferences and business requirements. The report date range feature allows users to narrow down the scope of the report to focus on transactions within a particular timeframe. For instance, users may choose to review transactions from the current day, week, month, or even a custom date range to track financial activities efficiently.
Moreover, the “days entered / last modified” filter provides a powerful tool for analyzing transaction history based on modification dates. This filter enables users to differentiate between transactions based on when they were initially entered into the system and when they were last modified or edited. Understanding this distinction is crucial for accurately assessing the timeline of financial transactions and identifying any recent modifications or updates made to critical records.
Additionally, the column options within the Display section offer users the flexibility to tailor the report’s layout to suit their specific reporting needs. By selecting and arranging relevant columns such as transaction type, transaction number, date, name, and account, users can customize the report to focus on the most pertinent information for their business operations. Furthermore, the option to display deleted transactions provides valuable insight into any removed entries, allowing users to track changes effectively and maintain data integrity within QuickBooks Desktop.
Filters:
The Filters section empowers users to refine their search criteria and streamline the process of locating specific transactions within the Audit Trail report. With a wide range of filter options available, users can narrow down their search based on various parameters such as transaction name, amount, account, customer, vendor, and more.
Applying filters is a straightforward process that involves selecting the desired filter criteria from the available options and inputting specific information to define the search parameters. Users can leverage both text input and dropdown menus to specify filter criteria accurately, enhancing the precision of their search queries. Once applied, selected filters are displayed prominently within the Filters tab, providing users with a clear overview of the applied filters and facilitating easy modification or removal as needed.
Effective utilization of filters enables users to navigate large datasets more efficiently, identify specific transactions or patterns of interest, and extract actionable insights from the Audit Trail report. Whether investigating individual transactions, analyzing transaction trends over time, or conducting comprehensive audits of financial records, leveraging filters enhances the usability and effectiveness of the QuickBooks Audit Trail functionality.
These expansions provide additional clarity and detail to the sections, contributing to a more comprehensive understanding of the Audit Trail report customization options and filter functionalities within QuickBooks Desktop.
Header/Footer:
This tab is to edit and modify what shows up on the header and footer of the report in question. It’s all very self-explanatory so we won’t go into too much detail on this tab, if you find that you have questions, feel free to contact us or leave a comment below and we’d be more than happy to assist.
Fonts & Numbers:
Another straightforward set of selections. This tab is designed to modify the appearance of the report. By default, the report will take on the default report settings found under Edit>Preferences>Reports & Graphs>Company Preferences> Format, but each report can be modified individually from this tab.
With the explanation of the different report customizations available, let’s look at how to read the Audit Trail in QuickBooks desktop:
Reading the Audit Trail in QuickBooks Desktop can be simple with the right guidance. In the attached screenshot, you can see I’ve modified the columns to hide some and to show the transaction “Type” and “Transaction #” (shortened on the column name to Trans #). As you can see our Entered/Last Modified and Date do not match. As I mentioned earlier in this post, the Date is the actual Date ON the transaction, and the entered/last modified range looks to see when/if the item was created or touched last. This is an important distinction to realize, many new users get stuck here. Lastly, we can see who the transaction was last modified by. This information can be incredibly useful to see just WHO made that change or deleted that transaction. This is a great chance for me to mention this: Security is important and so is ensuring everyone has their own user within QuickBooks, this ensures the integrity of the data, and the ability to check the audit trail for changes. One last thing to note:
Every line on this report is the SAME transaction, just at different states in time, you can see what was modified/edited as indicated by the bold line. When reading the Audit Trail make sure you’re looking at the right transaction. We understand it can get confusing, especially with audit trail data becoming overwhelming with time! In that case, feel free to get in touch by clicking the link below; our Certified ProAdvisors stand by to help make sense of this report, and other reports your business uses in QuickBooks Desktop.
ANNOUNCEMENT: Looking for more QuickBooks guidance? We are hosting a Two-Day Seminar/Webinar on QuickBooks Desktop – on the 3rd and 4th of October 2019. It will take place at our Learning Center, and online! Space IS Limited; get your spot while spots remain.