In today’s QuickBooks tutorial we will walk you through the steps to reconcile an account in QuickBooks Desktop. First, we want to ensure we have our copy of QuickBooks open.
If you would like us to create a video demonstrating how this is done, please leave a comment below, or contact us for a one-on-one consultation.
Using QuickBooks Online? Check out Intuis blog here to learn how to reconcile accounts in QuickBooks Online.
IMPORTANT Before making any changes to your QuickBooks Company File, we always recommend making a backup.
Once we are on the home screen (the default landing page when you launch the software), we want to go to the reconcile menu, this can be accessed from the home screen underneath the “Banking” header. The other way is to go to the banking menu at the top of the screen and choose reconcile.
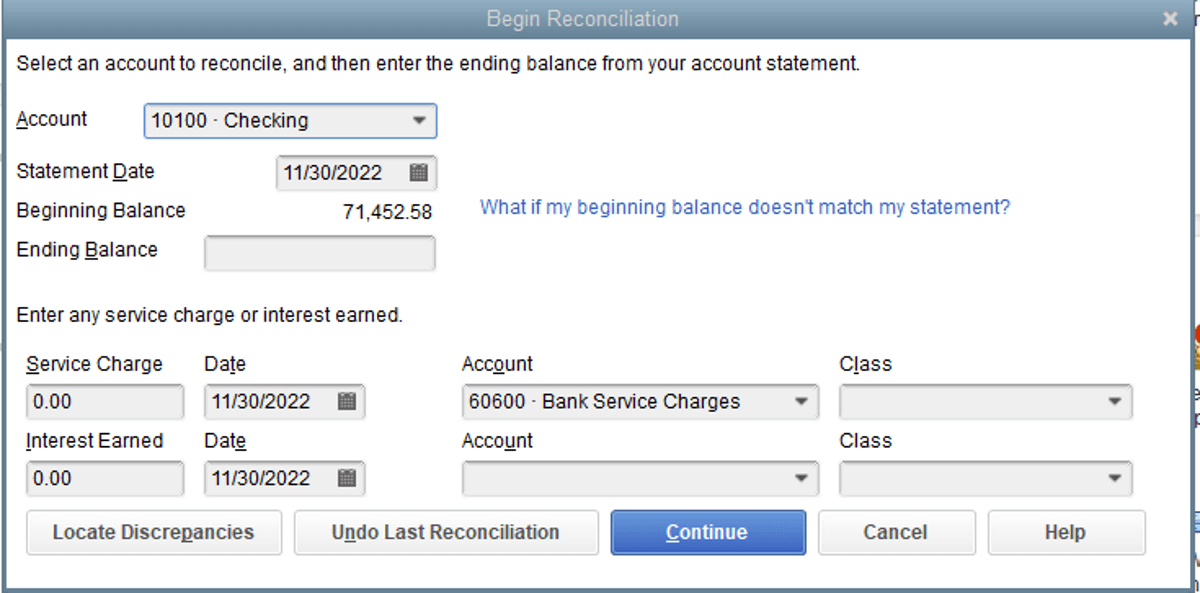
Now, once the “Begin Reconciliation” window is open, we’re going to have some fields that need to be filled out:
As you can see the first dropdown we have here is Account, this is the account in question we are going to be reconciling. Our statement is next, you can find this on, you guessed it, your statement. Our beginning balance should always match our ending balance of our last statement. Ending balance is where we input the ending balance from our statement.
Down below is where you would input any service charges or interest earned, the dates associated with them, as well as the accounts they hit, class being optional if you’re a company who tracks classes.
Once you’ve entered the ending balance from your statement, you want to click continue, this will take us to our next step, the reconciliation itself.
As you can see here, we have two columns, on the left is our “checks and payments (AP),” and on the right, we have our “Deposits and Other Credits (AR).”
What we do at this point is check our Bank Statement to what we have entered in our QuickBooks, to ensure that everything matches, as QuickBooks is intended to mirror real life.
Once you have completed your reconcile (ensuring you have a difference of zero in the bottom right hand corner) you’ll want to reconcile now, upon doing this, the transactions you have checked off will disappear from the list and you will be prompted to display, print or close out of the reconcile window:
We do recommend that you choose “both” and print the reports, that way you have a hard copy in the event anything catastrophic occurs in the company file. Once the option is selected, the reconciliation window will close, and place us back at the home screen.
As you can see in our screenshot, our ending balance from the reconciliation we did is now the beginning balance for the new reconcile! Neat huh?
As always:if you have any questions, comments, or concerns, call us!